You created a fast, lightweight WordPress website. You optimized images, set up caching, made all the recommended optimizations but your WordPress website still becomes incredibly slow once in a while? The reason might be simple – you are probably using shared hosting for your WordPress site.
Today you’ll learn why that happens, why WordPress speed is important, and how you can fix it all by moving your WordPress website from Shared hosting to VPS hosting. It may sound complicated when you think about it, but when you see the actual steps it’s not hard at all.
Instead of making a vague recommendation I made a real world step by step tutorial how to move WordPress website from Shared hosting to VPS. I actually moved website – wp2vps.com, mentioned in tutorial from GoDaddy shared hosting to Hostinger VPS, and documented every single step – from making a copy of a working WordPress site to orderign and setting up VPS server, pointing DNS address to new server, installing exact copy of my WordPress website into VPS server, and even enabling Let’s Encrypt SSL certificate at the end, so the website is moved completely.
You may also notice that I’m not moving entire hosting from Shared hosting to VPS – I move only website, and leave emails to work in my old shared hosting. The first reason for this is simple – if you have a huge number of email addresses in your shared hosting, it will be quite a big move to move email addresses and the actual emails to VPS – this move would require another tutorial. The other reason to move WordPress website to VPS server and leave shared hosting for emails is that shared hosting is fine for emails – shared hosting company will have all the necessary spam filters, and your email server will make all the needed work for maintaining email server – less work for you.
So here’s what you’ll learn to do today:
- Make a copy of the whole WordPress website, including database, from WordPress admin panel
- Get inexpensive, reliable and fast Hostinger VPS hosting for WordPress
- Configure VPS server for your WordPress site
- Point your website domain to VPS server
- Migrate your WordPress website to your new VPS server
- Install free SSL certificate for your website in VPS
All of these steps will take minutes. And you’ll accomplish it all in browser, without any coding or additional tools. And the best thing – that’s all the needed steps to move your WordPress website to VPS hosting from Shared hosting – no additional steps are required.
But first we need to get to the reason to move – why shared hosting is not the best option for WordPress hosting.
Why your WordPress website is slower in Shared hosting compared to VPS, and why that’s important
There are various types of website hosting. The most popular and least expensive is shared hosting.
Shared means that your website, and hundreds or thousands of other websites on the same server share the same hardware – the same CPU, memory, drives and network connection with lots of other websites that are working from the same server. This way your hosting provider can keep hosting prices low, and in theory you have good hosting for your sites.
But there’s a catch. Once ony of the other websites you share hosting with gets more traffic or runs a complicated script that requires lots of computer power, all the other websites, including yours, become slower, because they all use the same resources. That’s why sometimes your WordPress website loads fast, and sometimes – quite a bit slower, even if you did not change anything on the site.
VPS hosting is a bit different. You do share the same server with some other websites, but some of the hardware is always dedicated to your website, and nothing else. For example, you order VPS hosting with 2 CPU cores and 2GB of RAM. It means that a VPS server, which has tens or hundreds of CPU cores and terabytes of memory will always have 2 cores and 2GB of memory dedicated to your website only. So you no longer have these performance buttlenecks – your website loads fast all the time.

Google and your website visitors love fast websites. If your website is faster, your site visitors stay longer on your site, and that’s a great indicator for Google and other search engines that your site is worth climbing higher in search results. So it’s a win-win situation for all – it’s simple.
Now we know why website speed is important. Let’s get to the actual tutorial – how to move WordPress website from Shared Hosting to VPS hosting.
First step – make a copy of your WordPress website
Before making any changes in shared hosting, VPS server or your domain’s DNS records, we need to download a copy of your WordPress website to your computer. Then we’ll know it can be easily restored in old or new hosting no matter what.
To make a fully working copy of WordPress site, including database, go to Plugins >> Add New, and look for plugin named Duplicator. Install and activate it.

Once plugin is activated go to Duplicator in WordPress admin panel, and create a new package.

Click Next.

Duplicator will scan your WordPress site. If all scan results are good click Build.

Depending on website size build might take 5-15 minutes. Once it’s done you’ll be able to download two files – Installer script and website file and database Archive.

Download both these files – you will need to reupload them to your new VPS server a bit later.
Second step – get Hostinger VPS for your WordPress website
Once you have a copy of your WordPress website, now you’re ready to get VPS server.
Go to Hostinger, and choose the best VPS plan for your site. If you’re just beginning your WordPress journey, you won’t need the fastest plan with loads of storage space. VPS 2 should fit your needs just fine.

Since I’m going to use the VPS for multiple sites I’m choosing a bit more powerful VPS 3 hosting plan.
You can use coupon code IMAKEITWORK to get 10% off from any Hostinger VPS Hosting plan.

You need to select a perior you’re going to order VPS server (longer period – lower monthly price), enter email (will be associated with your Hostinger account), and fill the payment details.
Once that’s done you’ll need to activate your account by approving your entered email address – Hostinger will send you email with activation link.
Once email is aporoved click VPS server Plan >> Setup.

First – select location which is closest to your typical website visitors.
For example if you offer services in United States – choose server in United States. If most of your visitors come from Europe, select United Kingdom etc. The closer the region to your website visitors, the faster website will be for them.

Next – select OS with Control Panel.

In this example we’ll use Ubuntu Operating system with Webmin and Virtualmin control panels. They are free to use (no subscription fees), and quite simple to use.

Enter VPS hostname – domain name of your website, and enter secure pasword for server admin panels.

Check again if you entered all the information correctly and click Finish setup.

After finishing setup you’ll need to wait a few minutes till your VPS server status shows Running. It means that it’s ready to use.
Configure VPS server for your WordPress website

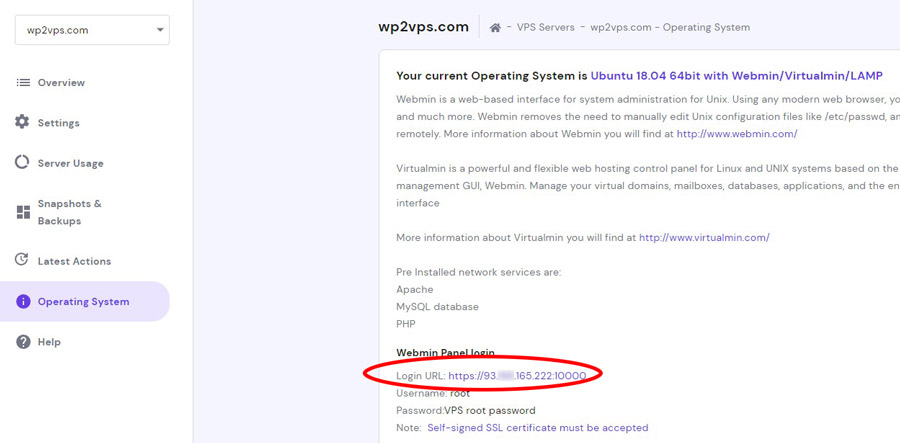
Once your VPS server is running click on it’s name – you will see it’s overview, server usage and other VPS server administration tools. To continue setup click Operating System tab on the left.

Now you’ll need to login to server’s Webmin panel – to the actual web server control panel where you could create a database, change all the main settings. Click on Login URL. By the way, this login URL contains your new VPS server IP address – write them down (like in the example – 93.[some number].162.222, without that :10000 part) , you’ll need it in domain DNS settings.
Login to your Webmin panel using name root, and enter the password you created few steps back.

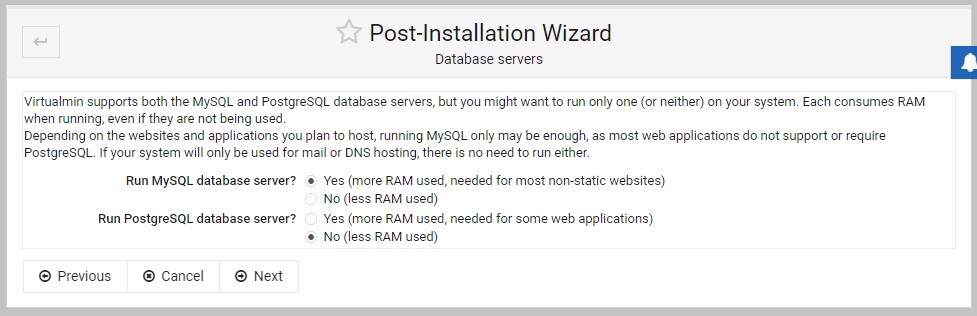
First time you’ll enter your WordPress VPS admin panel Webmin you”ll be greeted with Post-Installation Wizard. Here you’ll be huided through all the main web server settings. Click Next.

Leave Preload Virtualmin libraries disabled, and Run email domain lookup server enabled, as it is by default.

Leave virus scanning disabled.

Enable MySQL server – you’ll need it for WordPress database. Leave PostgreSQL server disabled.
Set any password for MySQL, or leave autogenerated password entered as it is, and just click Next.

Next step – memory size dedicated to MySQL. If you don’t have a massive and complicated WordPress website you cal leave default setting – 512 MB.

Leave primary nameserver as it is (autofilled), and click Next.

You may select how Virtualmin panel will save passwords – in plain text, or encoded (hashed). It’s a bir safer to have them hashed so even someone logs in to your admin panel won’t be ablew to see the password. But if you forget the password then you won’t be able to read it yourself. For now I leave it in plain-text just for convenience.

In the next step we’ll make a virtual server for the website we want to move to VPS – enter website domain (if it is not filled already), and click Next.

That’s it – server setup wizard is complete. Click Next.

Once the Wizard is complete click on Edit Virtual Server in the menu, check MySQL database enabled, and click Save Virtual Server.

Server will be restarted, and MySQL ready to use.

Go to Edit Databases in Virtualmin menu. There you’ll see the name of your new database for WordPress website in VPS server. Write it down – it will be needed when you’ll install WordPress to VPS. Then click on Usernames tab.

Username name will probably will be the same name as Database name. You may click Change to, and change database username to more difficult name for security purpuses. Don’t foget to click Save, and write it down – you’ll need to enter database username while setting up WordPress. Then click on Passwords tab.

Select Custom password, and enter any password you’ll want to use for WordPress database. Don’t forget it – you’ll need it in few minutes! Click Save.

Great – our VPS server is technically ready for WordPress installation.
Next step – link your WordPress website’s domain to VPS server
I’m moving my WordPress website from GoDaddy shared hosting so this part of the tutorial might be slightly different if you’re using different shared hosting company. But even if it is different, you’ll still need to do the same thing – go to your domain settings in your shared hosting admin panel, and change one DNS record I’ll write below.
If you’re using GoDaddy shared hosting, it’s very easy. Just click on your WordPress website domain, and select Manage DNS from the menu.

Find DNS record with a name @ , and click Edit.

Change DNS record Value from the shared hosting IP address to your new VPS server IP address you wrote down before, and hit Save.

Now you have some time to rest. DNS records need some time to update in global network. Usually it takes about an hour, sometimes two. You’ll know that new DNS record is active if you’ll go to your WordPress site, it won’t load properly anymore.
Before new DNS record starts loading website from VPS we still have some things thing to do – to migrate WordPress files to your new VPS server.
Migrate your WordPress website to your new VPS server
To move your previously downloaded WordPress files go to your Virtualmin VPS server control panel, and click File manager in the menu. Then look for folder public_html.
If there are any files in the publichtml folder (for example – index.html) select them and hit Delete icon at the right top of the window. You need public_html directory to be empty.

Then click File >> Upload to current directory.

Locate installer.php and your WordPress website’s archive file, and upload them to your VPS server’s public_html folder.

Click Upload.

Make sure that both files are uploaded to public_html directory.

That’s it – your WordPress files are in VPS server.
Now we’ll need to check if DNS changes started working – go to your WordPress website. If website no longer works, it means that you’ve done everything correctly, and now you’ll have a final step to do – install your WordPress website to your new VPS server.
To do that, go to http://[your wordpress website’s domain address]/installer.php, and run the Duplicator installation wizard. Check I have read and accept all terms…, and hit Next.

Enter your MySQL database information:
- host – localhost
- Database – your new database name you created in VPS server
- User – database username
- Password – database password you created few steps back.
Then hit Test Database. If you entered all the MySQL credentials correctly you’ll be able to hit button Next. Do it. Otherwise doublecheck your database credentials for mistakes, unnecessary spaces or other symbols.

Click OK to run WordPress installer in your VPS server.

Click Next.

If everything went smoothly you’ll be able to login to your WordPress website. Click Admin Login.

Once you’ll login to your WordPress website in VPS server, WordPress installer will clear all the unnecessary files used for installation, and your server will be ready to use.

WordPress website is sucessfully moved from Shared hosting to VPS!
Additional step – install free SSL certificate for your WordPress website in VPS server
If your website previously used SSL certificate you’ll notice that after moving WordPress from shared hosting to VPS SSL certificate does not work. That’s normal – SSL certificates are assigned for specific server. But that’s not a problem – we’ll fix it in few minutes with no extra costs:
- Open Virtualmin panel in your VPS, and go to Server Configuration >> SSL Certificate.
- Select Let’s Encrypt tab.
- Select Request certificate for >> Domain names listed here, and enter your domain name without www at the front in one line, and with www. at the front in the next line. Then hit Request Certificate button.

In a few minutes free Let’s Encrypt SSL certificate will be installed in your VPS server for your WordPress site, and website will start working with it.
If you previously did not have SSL certificate in your WordPress site you need to read How to enable SSL in WordPress and fix those non secure notifications once and for all.
That’s it – your WordPress website is sucessfully moved from slower shared hosting to way faster VPS server, and now is even working with SSL certificate!


